
Last week I took a personal day from work and stayed home finishing up a few final projects for Little Paul's big boy room. It's basically done now (eventually we'll purchase a nice area rug when we find a great deal on one and Paul is planning to install overhead lights in all of our bedrooms some time in the next year which will be fabulous!).
So here's a quick tour of the final little details!
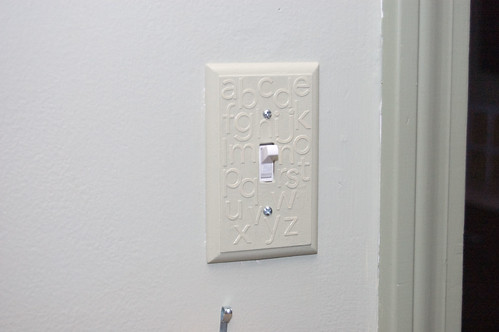
This is the light switch I blogged about earlier. It was just a basic cheapy wooden switchplate that I painted with a coordinating color. Then I glued scrapbooking letters to it, painted over it again, and gave it a quick spray with a clear coat for durability. It's subtle but I think it beats an ugly wood switch plate any time!
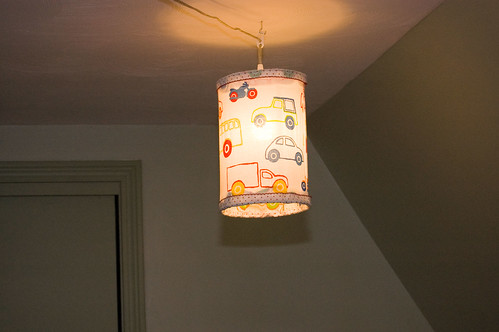
I recovered the shade for his hanging lamp. I'd bought 2 of these lamps on clearance at Ikea a few years ago (the other one, with the original cover, is in the nursery) and while the original cover blended it just wasn't cute enough. So I picked up this cute fabric (also from Ikea!) and ripped off the old fabric to use as a template. Add in a little time with my glue gun and we have a cute new light fixture!

I think this is my favorite project! I saw the idea on a blog I read, Blue Cricket Design and bookmarked it as a "must try" quite a while ago! I bought a piece of particle board and then created a template on the computer in just the right size. I traced it onto the board with a permanent marker and then Paul cut it out with his jigsaw. After a bit of light sanding I painted the whole thing with chalkboard paint and hung it in LP's room above his built-in drawers using those 3M velcro frame hanger things. I don't trust LP with his own chalk unsupervised so for now I just put stars where all of our family are (and yes, I'm not very good with geography so pretend it's right!). Eventually he can have some chalk to write on it himself!
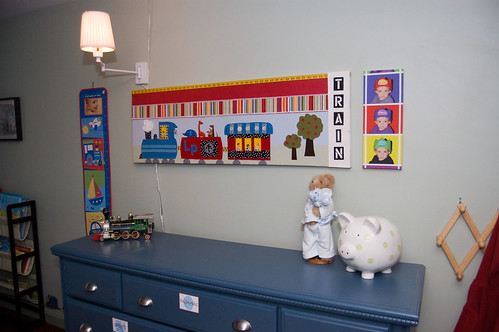
My final project was this train art to hang over the dresser (in an attempt to somewhat hide the cords that run up the wall for the light fixtures). I had a large canvas that I'd actually purchase to turn into a growth chart for LP before he was even born. I'd gotten as far as gluing some fabric and a tape measure to it before it ended up in my pile of unfinished projects.
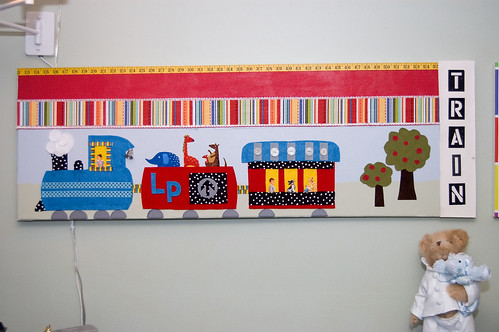
So I busted it out and ripped the fabric off the bottom half. I used felt, fabric, paint, buttons, and lots of glue to add a cute little train scene to the canvas.

There's a little boy driving the train (cut out of a piece of fabric leftover from when I decorated LP's nursery) and some zoo animals riding in the boxcar.
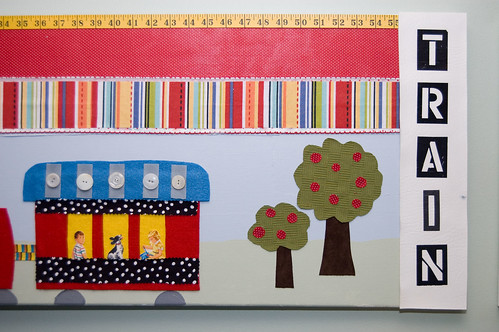
The caboose has passengers too- a little boy and girl and their doggy.
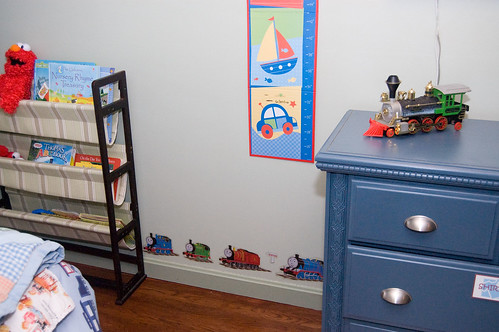
A final touch was some Thomas the Tank Engine wall decals. LP had picked these out at Target a few months ago and we'd put a few up in his nursery. He was VERY excited when I pulled them down to stick along the baseboards in his big boy room (and yes, sadly, they're probably his very favorite part of the room. He LOVES to go up there and point out each train).


Oh and he insists on throwing his big teddy bear onto the rug every time he goes into the room as well, as Big Teddy blocks his view of some of the Thomas the Train decals.
As I said, we're pretty much done and we had such a good time decorating the room! We did the whole thing for less than $600 which is pretty good considering that we refinished the floor, painted the walls and trim, bought a bed and a mattress and all of the bedding. We'll replace the little Ikea-bought play rug eventually but it will do for now!
On to the next project! Will it be the master bedroom or the office?? Decisions, decisions!

So here's a quick tour of the final little details!
This is the light switch I blogged about earlier. It was just a basic cheapy wooden switchplate that I painted with a coordinating color. Then I glued scrapbooking letters to it, painted over it again, and gave it a quick spray with a clear coat for durability. It's subtle but I think it beats an ugly wood switch plate any time!
I recovered the shade for his hanging lamp. I'd bought 2 of these lamps on clearance at Ikea a few years ago (the other one, with the original cover, is in the nursery) and while the original cover blended it just wasn't cute enough. So I picked up this cute fabric (also from Ikea!) and ripped off the old fabric to use as a template. Add in a little time with my glue gun and we have a cute new light fixture!
I think this is my favorite project! I saw the idea on a blog I read, Blue Cricket Design and bookmarked it as a "must try" quite a while ago! I bought a piece of particle board and then created a template on the computer in just the right size. I traced it onto the board with a permanent marker and then Paul cut it out with his jigsaw. After a bit of light sanding I painted the whole thing with chalkboard paint and hung it in LP's room above his built-in drawers using those 3M velcro frame hanger things. I don't trust LP with his own chalk unsupervised so for now I just put stars where all of our family are (and yes, I'm not very good with geography so pretend it's right!). Eventually he can have some chalk to write on it himself!
My final project was this train art to hang over the dresser (in an attempt to somewhat hide the cords that run up the wall for the light fixtures). I had a large canvas that I'd actually purchase to turn into a growth chart for LP before he was even born. I'd gotten as far as gluing some fabric and a tape measure to it before it ended up in my pile of unfinished projects.
So I busted it out and ripped the fabric off the bottom half. I used felt, fabric, paint, buttons, and lots of glue to add a cute little train scene to the canvas.
There's a little boy driving the train (cut out of a piece of fabric leftover from when I decorated LP's nursery) and some zoo animals riding in the boxcar.
The caboose has passengers too- a little boy and girl and their doggy.
A final touch was some Thomas the Tank Engine wall decals. LP had picked these out at Target a few months ago and we'd put a few up in his nursery. He was VERY excited when I pulled them down to stick along the baseboards in his big boy room (and yes, sadly, they're probably his very favorite part of the room. He LOVES to go up there and point out each train).
Oh and he insists on throwing his big teddy bear onto the rug every time he goes into the room as well, as Big Teddy blocks his view of some of the Thomas the Train decals.
As I said, we're pretty much done and we had such a good time decorating the room! We did the whole thing for less than $600 which is pretty good considering that we refinished the floor, painted the walls and trim, bought a bed and a mattress and all of the bedding. We'll replace the little Ikea-bought play rug eventually but it will do for now!
On to the next project! Will it be the master bedroom or the office?? Decisions, decisions!
cool room! my son would probably be jealous of the thomas decals. he's been begging for a "thomas room"...
ReplyDelete