
Thought I'd share a little photo tutorial of how I created the knobs for Little Paul's built-in drawers in case anyone is interested in the technique- it was very very easy and I think the results are great!
First, I took the knobs off the drawers and painted them (I picked up a small tester bottle of the wall color we used from Home Depot- it comes with a little brush in the cap which means you don't have to clean any paint brushes when you're done!). I punched holes in the top of an old shoe box to stand the knobs in so that they could dry. If you leave the screws in each knob you can use the screw to hold the knob while you paint it and then stick the screw through the hole in the shoebox.
First, I took the knobs off the drawers and painted them (I picked up a small tester bottle of the wall color we used from Home Depot- it comes with a little brush in the cap which means you don't have to clean any paint brushes when you're done!). I punched holes in the top of an old shoe box to stand the knobs in so that they could dry. If you leave the screws in each knob you can use the screw to hold the knob while you paint it and then stick the screw through the hole in the shoebox.

Next I rummaged through my craft supplies and pulled out a small piece of contact paper. I measured the diameter of the knobs and then used a permanent marker to write the numbers on the contact paper so that they'd fit on the knobs. I used a craft knife to cut out the numbers and then stuck them on each knob, making sure to press well on all of the edges.

The next step was to apply the paint to each knob. The paint I used is by Delta and is called "texture magic dimensional paint." I picked up a tube of it at a craft store a while ago (2007, apparently, according to the price tag still on the tube). I happened to have a tube of red dimensional paint which is just what I wanted but if you can't find the exact color you want you can paint it with acrylic paint once it's dried. Oh, and you can use this paint for all sorts of things- I've used it with stencils to make wood plaques as well.
You basically use a small spatula or a palette knife or even a tongue depresser type thing to spread the paint over the stencil. Try to get it as smooth and even as possible but you can always sand it a bit once it's dry to even it out.
You basically use a small spatula or a palette knife or even a tongue depresser type thing to spread the paint over the stencil. Try to get it as smooth and even as possible but you can always sand it a bit once it's dry to even it out.


Right after you apply the paint peel the contact paper off to see the results! Repeat on the rest of the knobs and then let dry at least overnight.


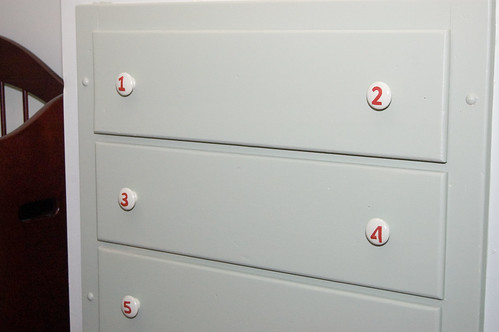
Once the dimensional paint was dry I used a small piece of fine grit sandpaper to smooth the paint up a bit. Then I used a clear spray paint to spray them so that they'll hold up well to small hands. Once dry, screw them back onto the drawers and enjoy!
Another quick little project I did to dress things up was to decorate the wooden switch plate. I painted it using the same sample pot of paint and then glued scrapbooking letters down on top.

I had to use a tweezers to get some of the letters in place.

When the glue had dried I painted another couple of coats over top and then sprayed it with the clear sealer. I don't have a picture of the final result but it looks really cute- almost as though the letters were embossed on the switchplate....

Comments
Post a Comment