
I've been cheating on my husband lately. When he crashes on the couch after LP goes to bed I say "adios" and run downstairs to my lovely new sewing room. I fold and refold all my fabric (and will show you some glamour-shots of my wonderful fabric closet soon!) and hum along to the purr of my sewing machine... I ogle my shiny scissors all lined up on their magnetic strip and admire my spools of thread, organized by color on their rack. It's mine! ALL MINE!!!
Yup, I'm a sewing nerd.
In all of my excitement I've started several new projects and am hoping to finish up some things to share with you soon.
Here's a quickie though that I whipped up a few weeks ago:
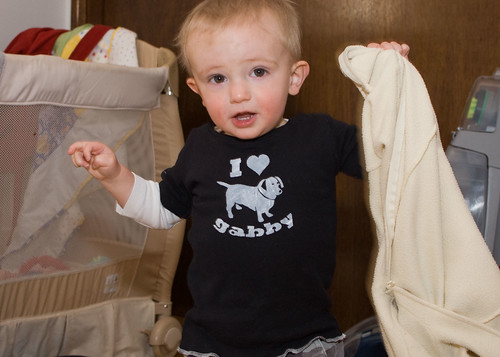
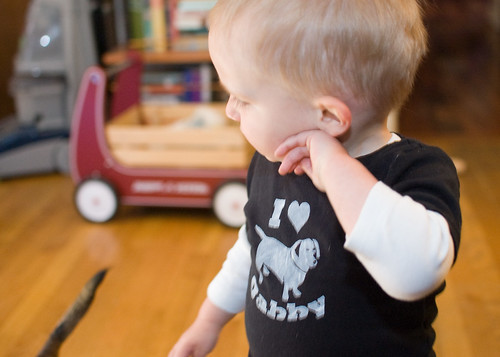
I made this t-shirt for LP out of an old t-shirt that had gotten too small on me thanks to my mom-bod. The size small tees I wore in college just don't fit any more, surprise surprise. So I cut a few up and sized them down to fit the little man.
All over the blog world people are doing FABULOUS things with freezer paper stencils. Freezer paper can be found at your regular old grocery store near the aluminum foil and plastic wrap. One side is paper, the other side has a waxy coating. And it will STICK temporarily to fabric if you iron it with the paper side up and the waxy side against your fabric. You can print out a design by cutting it to regular paper size and running it through your printer or just freehand or trace a design. Cut out the stencil, iron it to your tee, and fill in the space with fabric paint. Here's a link to a great, more detailed tutorial by a blogger who quotes the New Kids on the Block in her post- rockin'!
So once I'd shrunk down my t-shirt I decided to special it up for little LP (ooo so redundant!). I used a photo of Gabby our dachshund to make a silhouette and added the I (heart) Gabby words around the image. I think it turned out pretty cute and LP loves wearing his "Babby" shirt.
And you'll have to use your imagination as I haven't snapped a pic yet but LP has a coordinating white t-shirt with I (heart) Socks on it in black paint...
Try it out sometime- you can freezer paper stencil practically anything, pillows, tote bags, hats, etc. It's pretty quick, so fun, and easy to do!

Yup, I'm a sewing nerd.
In all of my excitement I've started several new projects and am hoping to finish up some things to share with you soon.
Here's a quickie though that I whipped up a few weeks ago:
I made this t-shirt for LP out of an old t-shirt that had gotten too small on me thanks to my mom-bod. The size small tees I wore in college just don't fit any more, surprise surprise. So I cut a few up and sized them down to fit the little man.
All over the blog world people are doing FABULOUS things with freezer paper stencils. Freezer paper can be found at your regular old grocery store near the aluminum foil and plastic wrap. One side is paper, the other side has a waxy coating. And it will STICK temporarily to fabric if you iron it with the paper side up and the waxy side against your fabric. You can print out a design by cutting it to regular paper size and running it through your printer or just freehand or trace a design. Cut out the stencil, iron it to your tee, and fill in the space with fabric paint. Here's a link to a great, more detailed tutorial by a blogger who quotes the New Kids on the Block in her post- rockin'!
So once I'd shrunk down my t-shirt I decided to special it up for little LP (ooo so redundant!). I used a photo of Gabby our dachshund to make a silhouette and added the I (heart) Gabby words around the image. I think it turned out pretty cute and LP loves wearing his "Babby" shirt.
And you'll have to use your imagination as I haven't snapped a pic yet but LP has a coordinating white t-shirt with I (heart) Socks on it in black paint...
Try it out sometime- you can freezer paper stencil practically anything, pillows, tote bags, hats, etc. It's pretty quick, so fun, and easy to do!
Comments
Post a Comment